2D, 3D UI
2D 와 3D UI의 보여지는 우선 순위
UICamera의 Depth 설정에 의해 먼저 보여질 것이 결정 된다.
3D 카메라의 Depth 가 2, 2D 카메라의 Depth가 1 면 3D카메라의 UI가 더 앞에 배치 된다.
반대의 경우가 필요하다면 Depth값을 바꿔서 어느쪽이 먼제 보이게 할지 결정 할 수 있다.
Depth 값이 큰 카메라쪽의 물체가 먼저 보이게 된다.
윈도우 형식의 UI 만들기
3D UI를 한개 만든다. 의례적으로,
윈도우의 중심은 Add New Child로 빈 오브젝트를 만들고, UI 요소들을 자식으로 추가하면 관리하기 편하다.
Add New Child로 중심 오브젝트를 설정한다.
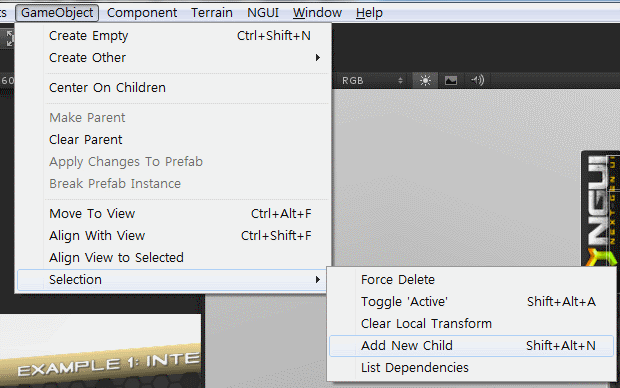
빈오브젝트를 잘 활용해서 윈도우 계층구조를 만든다.

NGUI에서 사용할 비트맵 폰트 만들기
Bitmap font generator로 비트맵 폰트를 만든다.
| FontSetting | 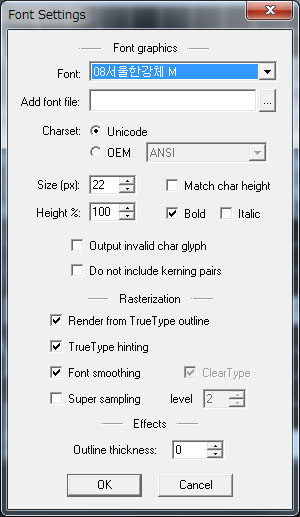 |
Bit Depth 를 8로 맞추면 폰트 외곽 부분이
제대로 처리 되지 않아서 글자가 이상하게 나오게 된다. |
이렇게 그리다 만듯한… |
| Export Options | 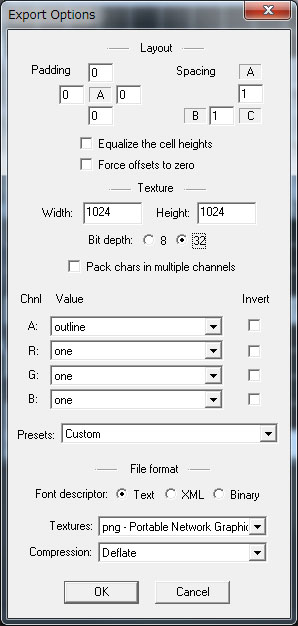 |
| 텍스쳐 크기를 1024×1024로 변경했는데, NGUI폰트 생성기가 한장만 인식하는 것 같아서 하나만으로 생성. 256×256이면 글자가 이상해지지 않을까? |
폰트 파일을 저장합니다. ( Save bitmap font as )
-
미리 보기 화면으로 보면 하얗게 보이지만 글자가 흰색이고 배경이 투명해서 이렇게 나오지만, 그리고 이렇게 보여야 정상.
이미지를 확대해서 보면 글자가 보인다.

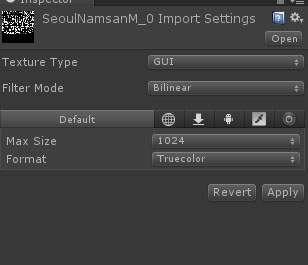
확장자를 fnt 에서 txt로 변경. 유니티에서 fnt 파일을 인식하지 못해서 변경이 필요.
Assets으로 등록
텍스쳐 파일 옵션을 바꾼다. 안바꿔도 되는지 확실해 모르겠네…
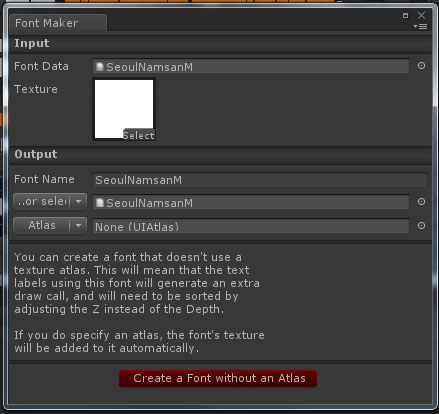
NGUI로 폰트 만들기
먼저 폰트 메뉴 선택

폰트 정보 선택
중요 컴포넌트와 스크립트
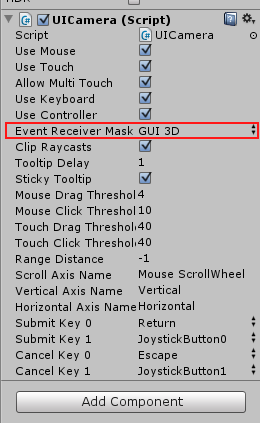
UICamera
= Event Receiver Mask : UI 입력을 받을 레이어를 설정한다.
= : 이 레이어를 따로 하지 않으면, (기본은 Default) UI 요소를 선택했을때 화면에서도 UI 반응이 그대로 전달된다.
UILabel
[RrGgBb]<텍스트>[-] 형식으로 UILabel의 텍스트에 색상을 줄 수 있다.
[ff0000]붉은 글씨[-]를
| <color red>붉은 글씨</color>를 |
Tip, tip
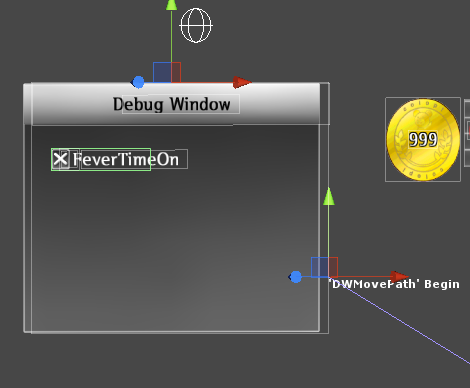
NGUI + iTweenPath
좀 희한한 현상,
iTweenPath를 Scene 에서 추가할때,
iTweenPath를 사용하는 오브젝트가 이 iTweenPath-begin 위치보다 더 z 축으로 뒤에 있으면
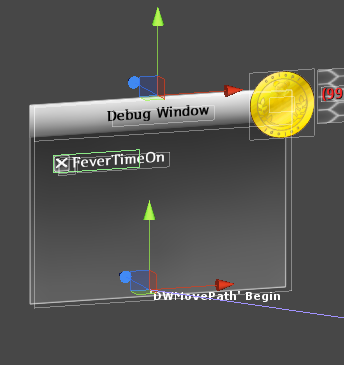
UITexture를 사용하는 오브젝트의 Z 축이 엉망이 되서,
가장 위에 노출된다. 다른 오브젝트가 가려버린다.
헐.. 왜 그럴까. 아무튼 Z 축을 조정하면 잘 나오니 문제 없지만.
이게..
원래 이렇게 잘 보여야 하는데 (숫자 999부분, 동전 부분은 UITexture)
이렇게 iTweenPath를 사용하는 오브젝트의 위치가 begin 앞쪽인데,
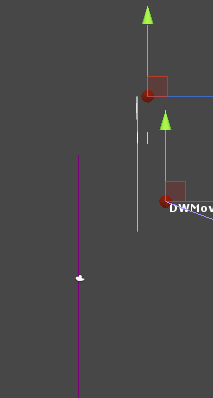
begin 뒤쪽으로 이동하면
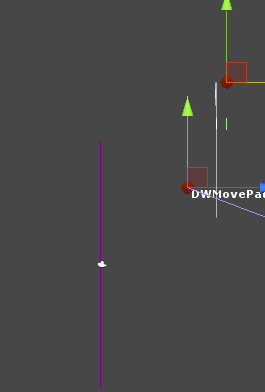
숫자부분이 UITexture 뒤에 가려진다.
NGUI : 플로팅 텍스트
오브젝트를 따라다니는 텍스트
플로팅 score 를 구현하는데 쓰는 방법
NGUI를 사용해서 요런 기능을 추가한다.
동작 시나리오1
화면을 임의 클릭
해당 위치에 '+1 coin' 이라는 라벨이 나타난다.
'+1 coin'은 위로 움직이면서 적당한 시간이 되면 사라진다.
동작 시나리오2
화면상의 임의 오브젝트에 '+1 coin'라는 라벨이 오브젝트 살짝 위쪽으로 따라다닌다.
유의사항
NGUI의 3D UI는, 화면상에 오브젝트가 너무 작게 나왔다. 아직은 잘 모르겠다.
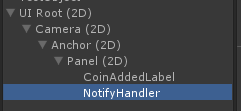
준비 작업
NGUI의 2D UI를 추가
“Panel (2D)“에, 'Panel'인데 이름을 바꿨다,
'CoinAddedLabel' 라벨 추가
빈 오브젝트, 'NotifyHandler' 추가 « 나중에 스크립트 추가를 위한 오브젝트로 사용한다.
화면
floating 에 대한 스크립트를 붙일 테스트 오브젝트 추가, 'objTest'
오브젝트 따라 다니는 라벨
프로그래밍으로 동적 추가도 가능하고, Hierarchy에 NGUI Label을 추가해서 사용할 수도 있다.
순서
오브젝트에 붙일, NGUI Label을 하나 추가. (이름, FloatingTextLabel)
FloatingText2D.cs 를 FloatingTextLabel 라벨이 추가한다.
TargetObject에 따라다닐 오브젝트를 추가 ( 위에서 만든, 'objTest'를 추가 )
WorldCamera 에 메인 카메라 추가
GUI Camera에 NGUI에 추가된 카메라 추가
Default Size에는 .. 그대로 유지.
여기 값은 확대 배율이므로 숫자 1이면 그대로,
1을 기준으로 줄이거나 늘린다.
실행해보면 오브젝트를 따라다니는 라벨이 보인다. 결과 화면,

임의 위치에 나타나서, 위로 움직이는 라벨
'FloatingTextUp2D.cs'를 붙인 라벨을 만들고, prefab로 만든다.
이 스크립트는, 움직이다가 게임 오브젝트를 삭제하므로 코드상에서 생성해야 한다.
테스트용 오브젝트를 만들어서 스크립트를 가져다 붙여도 동작하므로 테스트 가능.
코드로 FloatingTextUp2D 생성할 때는,
임의 빈 오브젝트 추가 ( 이름은 스크립트와 같은 걸로 만들었다. )
이 오브젝트에 아래 스크립트를 붙여서, 다른 곳에서 사용할 수 있게 준비해 둔다.
fire() 함수를 부르면 스크립트가 clickedPos_ 위치부터 위로 움직인다.
NotifyHandler.cs
using UnityEngine;
using System.Collections;
public class NotifyHandler : MonoBehaviour {
public Camera mainCamera;
public Camera guiCamera;
public GameObject prefab;
public void fire( Vector3 clickedPos_ )
{
  GameObject _gameObj = Instantiate( prefab, clickedPos_, Quaternion.identity ) as GameObject;
  // No mean yet, just align as child
  SomeTools.AppendChildAndReset( gameObject, _gameObj );
  // run floating script
  FloatingTextUp2D _floatTxtUp = _gameObj.GetComponent<FloatingTextUp2D>();
  _floatTxtUp.initAndStartMoving( clickedPos_, mainCamera, guiCamera );
}
}
NotifyHandler 에 임의 메시지 보내기.
UIInputReactor
using UnityEngine;
using System.Collections;
public class UIInputReactor : MonoBehaviour {
void Update()
{
  if( Input.GetButtonDown("Fire1") ) {
    // 화면을 임의 클릭해서, 뭐든 있는 위치를 캐치해서,
    Ray ray = Camera.main.ScreenPointToRay(Input.mousePosition);
    RaycastHit hit;
    if( Physics.Raycast(ray, out hit, 100) ) {
      // NotifyHandler 오브젝트에 메시지 발송 (fire 실행)
      GameObject _obj = GameObject.Find("NotifyHandler");
      _obj.SendMessage( "fire", hit.point );
    }
  }
}
}
결과화면,
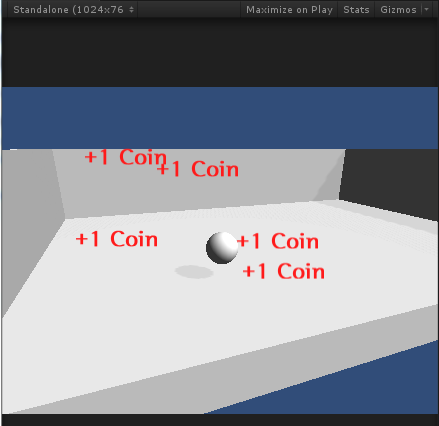
사용한 프로젝트 화면
사용한 스크립트
오브젝트를 따라다니는 라벨
FloatingText2D.cs
- FloatingText2D.cs
using UnityEngine;
using System.Collections;

public class FloatingText2D : MonoBehaviour
{
  private UILabel   	__label;
	private Vector3			__pos;
	private Transform		__t;


	public bool 			followTarget = true;
	public Vector3			defaultSize = new Vector3(1,1,1);

	public GameObject		targetObject;
	public Camera			worldCamera;
	public Camera			guiCamera;
	public TweenPosition	tweenPos;


	public void init( string text_, GameObject gameObj_ )
	{
		this.text = text_;
		this.target = gameObj_;
	}

	public void init( string text_, Color clr_, GameObject gameObj_ )
	{
		this.color = clr_;
		this.text = text_;
		this.target = gameObj_;
	}

	public void spawnAt( GameObject targetObj_, Vector3 size_, Transform parent_ )
	{
		target = targetObj_;
		__t.parent = parent_;
		defaultSize = size_;
	}

	public void followingObject()
	{
		__pos = worldCamera.WorldToViewportPoint( targetObject.transform.position );
		__pos = guiCamera.ViewportToWorldPoint( __pos );

		__pos.z = 0f;
		transform.position =  __pos;
	}

	// Use this for initialization
	void Awake()
	{
		__t = transform;
		__label = GetComponent<UILabel>();
	}

	void Start()
	{
		if( guiCamera == null )
			guiCamera = NGUITools.FindCameraForLayer( gameObject.layer );

		__label.transform.localScale = new Vector3( __t.transform.localScale.x * defaultSize.x, __t.transform.localScale.y * defaultSize.y, 1f );
	}

	void LateUpdate()
	{
		if( followTarget ) followingObject();
	}

	// property
	//
	public string text
	{
		get { return __label.text; }
		set { __label.text = value; }
	}

	public Color color
	{
		get { return __label.color; }
		set { __label.color = value; }
	}

	public Vector3 size
	{
		get { return __label.transform.localScale; }
		set { __label.transform.localScale = value; }
	}

	public TweenPosition tweenPosition
	{
		get {
			TweenPosition _tp = GetComponent<TweenPosition>();
			if( _tp == null ) _tp = targetObject.AddComponent<TweenPosition>();
			return _tp;
		}
	}

	public GameObject target
	{
		get { return targetObject; }
		set {
			targetObject = value;
			worldCamera = NGUITools.FindCameraForLayer( targetObject.layer );
		}
	}
}
특정 위치에서 나타나서 위로 이동하는 라벨. 아래 부분에 업데이트 된 코드 있다.
FloatingTextUp2D.cs
- FloatingTextUp2D.cs
using UnityEngine;
using System.Collections;

public class FloatingTextUp2D : MonoBehaviour {
  private UILabel 		__label;			// from ScriptIncluded
  private Vector3			__pos;
  private Vector3			__initPos;

  public Camera			guiCamera = null;
  public Camera			worldCamera = null;

  public GameObject		targetObject = null;
  public int				tweenTime = 2;
  public int				tweenDistance = 50;

	// class spec function
	//
	public void destroySelf() {
		Destroy( gameObject );
	}

	public void initAndStartMoving( Vector3 initPos_, Camera mainCam_ = null, Camera guiCam_ = null )
	{
		if( mainCam_ != null ) worldCamera = mainCam_;
		if( guiCam_ != null ) guiCamera = guiCam_;
		startMoveUp( initPos_, 2, 50 );
	}

	public void startMoveUp( Vector3 initPos_, int tweenDuration_, int tweenEnd_ )
	{
		__initPos = initPos_;
		calculatePosition( initPos_ );

		TweenPosition _tp = this.tweenPosition;
		_tp.duration = tweenDuration_;
		_tp.from = transform.localPosition;
		_tp.to = _tp.from + Vector3.up * tweenEnd_;
		_tp.eventReceiver = gameObject;
		_tp.callWhenFinished = "destroySelf";
	}

	public void calculatePosition( Vector3 pos_ )
	{
		__pos = worldCamera.WorldToViewportPoint( pos_ );
		__pos = guiCamera.ViewportToWorldPoint( __pos );
		__pos.z = 0f;
		transform.position =  __pos;
	}

	// Unity3d reaction function
	//
	public void Awake() {
		__label = GetComponent<UILabel>();
	}

	void Start()
	{
		if( guiCamera == null ) guiCamera = NGUITools.FindCameraForLayer( gameObject.layer );
		if( worldCamera == null ) worldCamera = Camera.mainCamera;
		__label.MakePixelPerfect(); // why bigger???
		if( targetObject != null ) {
			startMoveUp( targetObject.transform.position, tweenTime, tweenDistance );
		}
	}

	// Property helper
	//
	public TweenPosition tweenPosition {
		get {
			TweenPosition _tp = GetComponent<TweenPosition>();
			if( _tp == null ) _tp = gameObject.AddComponent<TweenPosition>();
			return _tp;
		}
	}
}
FloatingTextUp2D
UILabel을 화면 어딘가( 프로그램 지정 )에서 위쪽으로 흘려 보내는 스크립트.
기본 사용법
빈 오브젝트를 만든다. or UILabel을 추가한다. » 오브젝트를 objFTUp 이라고 부르기로 하고.
objFTUp 에 FloatingTextUp2D 를 추가한다.
objFTUp을 prefab 으로 만들어서, 프로그램에서 사용한다. or 화면에 추가해서 사용한다.
추가 수정 사항
-
수정해야할 것
UILabel 크기 조정
UILabel 로부터 가져와서 사용한 부분
Vector2 getUILabelSize()
폰트 픽셀 크기를 얻어와서, UILabel의 전체 크기를 구하는 함수. 출력 위치를 화면 안쪽으로 옮길때 사용하므로, 크기 조정된 rect를 리턴할 수 있도록 수정
// 지정폰트 픽셀크기를 구해서(보통 1)
float pixelSize = (mLabel.font.atlas != null) ? mLabel.font.atlas.pixelSize : 1f;
// 스케일 비율에 맞춰 너비를 계산
Vector3 scale = mLabel.cachedTransform.localScale;
// 자동 스케일 기능이 켜져 있으면,
if( scaleByScreen != 0f )
  // (화면크기 / 글자수) * (확대축소비율) = 실제로 출력 되어야 할 너비
  scale.x = ((guiCamera.pixelWidth / mLabel.relativeSize.x) * scaleByScreen);
else
  // 그게 아니면 원래 사용하던 방식으로 계산. (예상, 폰트크기가 그대로 scale.x에 반영)
  scale.x = mLabel.font.size * pixelSize;
scale.y = scale.x;
scale.z = 1f;
return (mLabel.relativeSize * scale.x); // 글자수 * 글자당스케일
void adjustScale()
UILabel::MakePixelPerfact()함수를 가져와서, 스케일 조정하는 부분의 코드에서 scaleByScreen 에 희망 확대 비율이 적혀 있으면 그 크기만큼 조정한다.
public void adjustScale() {
// 화면 확대 설정이 없으면, 원래 크기대로 설정한다.
if( scaleByScreen == 0f ) {
  mLabel.MakePixelPerfect();
  return;
}
else if( mLabel.font != null ) {
  float pixelSize = (mLabel.font.atlas != null) ? mLabel.font.atlas.pixelSize : 1f;
  Vector3 scale = mLabel.cachedTransform.localScale;
  //scale.x = mLabel.font.size * pixelSize; // 원래코드
  // 화면 확대 비율만큼 너비를 계산한다.
  scale.x = ((guiCamera.pixelWidth / mLabel.relativeSize.x) * scaleByScreen);
  //
  //... 나머지 부분은 UILabel.MakePixelPerfact()와 같다.
}
}
그외 변경사항
UILabel에서 중요한 역할을 한 변수들
FloatingTextUp2D.cs
- FloatingTextUp2D.cs
using UnityEngine;
using System.Collections;

[RequireComponent( typeof( TweenPosition ) )]
public class FloatingTextUp2D : MonoBehaviour
{
  public enum Side
	{
		Left,
		Right,
		Center,
		NoOutOfScreen,
		NoTouch
	}

	private UILabel 		mLabel;			// from ScriptIncluded
	private Vector3			mObjPos;

	public Camera			guiCamera = null;
	public Camera			worldCamera = null;
	public GameObject		targetObject = null;
	public float			tweenDuration = 2.5f;
	public float			tweenDistance = 350f;
	public Side				startSide = Side.NoOutOfScreen;
	/// <summary>
	/// move up by Percent from -1 ~ 1. 0 is middle of scrren. If this is false, tweenDistance used to end of tween moving.
	/// </summary>
	public bool				moveUpByPercent = false;
	/// <summary>
	/// how much move up? this value from -1 to 1. 0 is middle of screen.
	/// </summary>
	[Range(-1, 1)]
	public float			moveUpPercent = 0f;
	/// <summary>
	/// Auto Scale by screen width. if zero, use original size. if 1, full width.
	/// </summary>
	[Range( 0, 1 )]
	public float			scaleByScreen = 0f;
	/// <summary>
	/// If scaleByScreen not setted. use this.
	/// </summary>
	//public Vector2			defaultSize = new Vector2( 1, 1 );

	public void destroySelf()
	{
		Destroy( gameObject );
	}

	// get UILabel width, height roughly. code from UILabel.MakePixelPerfect()
	public Vector2 getUILabelSize()
	{
		float pixelSize = (mLabel.font.atlas != null) ? mLabel.font.atlas.pixelSize : 1f;
		Vector3 scale = mLabel.cachedTransform.localScale;
		if( scaleByScreen != 0f )
			scale.x = ((guiCamera.pixelWidth / mLabel.relativeSize.x) * scaleByScreen);
		else
			scale.x = mLabel.font.size * pixelSize;
		scale.y = scale.x;
		scale.z = 1f;

		return (mLabel.relativeSize * scale.x);
	}

	public Vector3 fixPosition( Vector3 value_ )
	{
		Rect rect = new Rect();
		rect = guiCamera.pixelRect;

		if( startSide != Side.NoTouch )
		{
			Vector3 _tmpPos = guiCamera.WorldToScreenPoint( value_ );
			Vector2 _labelSize = getUILabelSize();
			float _middleX = Mathf.Abs( _labelSize.x * mLabel.pivotOffset.x );

			if( startSide == Side.Center )
			{
				_tmpPos.x = (rect.xMin + rect.xMax) * 0.5f;
			}
			else if( startSide == Side.Left )
			{
				_tmpPos.x = (rect.xMin + _middleX);
			}
			else if( startSide == Side.Right )
			{
				_tmpPos.x = (rect.xMax - _middleX);
			}
			else if( startSide == Side.NoOutOfScreen )
			{
				if( (_tmpPos.x - _middleX) < rect.xMin ) _tmpPos.x = rect.xMin + _middleX;
				if( (_tmpPos.x + _middleX) > rect.xMax ) _tmpPos.x = rect.xMax - _middleX;
			}

			value_ = guiCamera.ScreenToWorldPoint( _tmpPos );
		}
		return value_;
	}

	public void adjustPosition( Vector3 pos_ )
	{
		mObjPos = worldCamera.WorldToViewportPoint( pos_ );
		mObjPos = guiCamera.ViewportToWorldPoint( mObjPos );

		mObjPos = fixPosition( mObjPos );

		mObjPos.z = 0f;
		transform.position =  mObjPos;
	}

	public void adjustScale()
	{
		if( scaleByScreen == 0f )
		{
			mLabel.MakePixelPerfect(); // why bigger???
			return;
		}
		else if( mLabel.font != null )
		{
			float pixelSize = (mLabel.font.atlas != null) ? mLabel.font.atlas.pixelSize : 1f;

			//pixelSize = 4;

			Vector3 scale = mLabel.cachedTransform.localScale;
			//scale.x = mLabel.font.size * pixelSize;
			scale.x = ((guiCamera.pixelWidth / mLabel.relativeSize.x) * scaleByScreen);
			scale.y = scale.x;
			scale.z = 1f;

			Vector2 actualSize = mLabel.relativeSize * scale.x;

			int x = Mathf.RoundToInt( actualSize.x / pixelSize );
			int y = Mathf.RoundToInt( actualSize.y / pixelSize );

			Vector3 pos = mLabel.cachedTransform.localPosition;
			pos.x = Mathf.FloorToInt( pos.x / pixelSize );
			pos.y = Mathf.CeilToInt( pos.y / pixelSize );
			pos.z = Mathf.RoundToInt( pos.z );

			if( mLabel.cachedTransform.localRotation == Quaternion.identity )
			{
				if( (x % 2 == 1) && (mLabel.pivot == UILabel.Pivot.Top || mLabel.pivot == UILabel.Pivot.Center || mLabel.pivot == UILabel.Pivot.Bottom) ) pos.x += 0.5f;
				if( (y % 2 == 1) && (mLabel.pivot == UILabel.Pivot.Left || mLabel.pivot == UILabel.Pivot.Center || mLabel.pivot == UILabel.Pivot.Right) ) pos.y -= 0.5f;
			}

			pos.x *= pixelSize;
			pos.y *= pixelSize;

			mLabel.cachedTransform.localPosition = pos;
			mLabel.cachedTransform.localScale = scale;
		}
	}

	public void startMoveUp( Vector3 initPos_, float tweenDuration_, float tweenEnd_ )
	{
		adjustScale();
		adjustPosition( initPos_ );

		TweenPosition _tp = this.tweenPosition;
		_tp.eventReceiver = gameObject;
		_tp.callWhenFinished = "destroySelf";
		_tp.from = transform.localPosition;

		if( moveUpByPercent )
		{
			_tp.to = Vector3.up * (Screen.height * 0.5f) * moveUpPercent;
			_tp.to.x = _tp.from.x;
		}
		else
		{
			_tp.to = _tp.from + Vector3.up * tweenEnd_;
		}

		if( tweenDuration_ != 0 )
		{
			_tp.duration = tweenDuration_;
		}
	}

	public void initAndStartMoving( Vector3 initPos_, Camera mainCam_ = null, Camera guiCam_ = null )
	{
		if( mainCam_ != null ) worldCamera = mainCam_;
		if( guiCam_ != null ) guiCamera = guiCam_;

		startMoveUp( initPos_, tweenDuration, tweenDistance );
	}

	// Unity3d reaction function

	public void Awake()
	{
		mLabel = GetComponent<UILabel>();

	}

	void Start()
	{
		if( guiCamera == null ) {
			guiCamera = NGUITools.FindCameraForLayer( gameObject.layer );
		}
		if( worldCamera == null ) {
			worldCamera = Camera.mainCamera;
		}

		if( targetObject != null ) {
			startMoveUp( targetObject.transform.position, tweenDuration, tweenDistance );
		}
	}

	public TweenPosition tweenPosition
	{
		get {
			TweenPosition _tp = GetComponent<TweenPosition>();
			if( _tp == null ) _tp = gameObject.AddComponent<TweenPosition>();
			return _tp;
		}
	}
}
TweenAlapha
케이스 1
GameObject에 TweenAlpha를 컴포넌트로 추가한 다음, 필요할때마다 사용하고 싶을때
// debugMenu가 show_ 플래그에 따라 화면에 보이거나 사라지거나 하는 동작이 있을때,
// true 면 alpha 값이 0 에서 1로 (점점 보여지도록), false면 그 반대로
// 애니메이션 시작되면서 알파 값이 적용 되도록한다.
// 느릴려나..?
public void debugMenuOn( bool show_ )
{
  AnimationState _animState = debugWindow.animation["menuMoveInside"];
  TweenAlpha _tweenAlpha = debugWindow.GetComponent<TweenAlpha>();
  _tweenAlpha.Reset();
  if( show_ )
  {
    _animState.speed = 1;
    _tweenAlpha.from = 0;
    _tweenAlpha.to = 1;
  }
  else
  {
    _animState.speed = -1;
    _animState.time = _animState.length;
    _tweenAlpha.from = 1;
    _tweenAlpha.to = 0;
  }
  _tweenAlpha.enabled = true;
  debugWindow.animation.Play( "menuMoveInside" );
}
케이스2
GameObject에 TweenAlpha를 컴포넌트로 추가한 다음, 필요할때마다 사용하고 싶을때 2
다른 케이스.
스크립트 내에서 컴포넌트로 추가된 TweenAlpha를 불러와서 코드로 시작하게 하는
float _from = 1f;
float _to = 0f;
float _duration = 0.2f;

TweenAlpha _ta = mBackground.GetComponent<TweenAlpha>();
_ta.Reset();
_ta.eventReceiver = gameObject; // Tween이 종료되면, destroySelf() 를 불러, 오브젝트를 삭제한다.
_ta.callWhenFinished = "destroySelf";
_ta.from = _from;
_ta.to = _to;
_ta.duration = _duration * 2f ;
_ta.Play( true ); // play! 파라미터가 false면 반대로 플레이 된다고 하는데 확인 하진 않음.
Quick 으로 빨리 쓰고 싶을때
컴포넌트로 추가되어 있지 않아도 자동 추가하며, UIWidget을 계열 오브젝트면 바로 적용 된다.
//- TweenAlpha : quick example
TweenAlpha _ta = mBackground.GetComponent<TweenAlpha>();
_ta.duration = 0.5f;
_ta.from = 1;
_ta.to = 0;